 (This is a rather extreme case.)
How do you make sure it's playable?
There are several aspects of the condition of these instruments that will impact its playability. I'll try to run them down in rough order of importance and likelihood.
First a quick glossary - Soundboard: the top panel of the instrument, just under the strings, containing the decals and the soundhole. Back - the opposite panel, the bottom, probably just painted black. Pin block - a thick piece of wood sandwiched between the soundboard and the back, into which are placed the following two types on pins. Tuning pins - also called zither pins, even by non-zither folks - the thick, upright pins which have several turns of string wrapped around them. Hitch pins or dead pins - small pins that look like cut off nails, around which a loop of the string is placed. These are usually hiding under an end cover.
1. Loose glue joints.
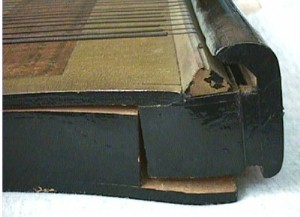
These instruments were assembled with hide glue, which is water-soluble and activated by temperature. The manufacturer mixed up glue particles with water and put the mixture in a warm pot for use during assembly. The corollary is, unfortunately, that getting hot again causes the glue to release. And where did they keep that old thing for the last 60 or 70 years? In that 130-degree-summertime attic, of course.The other bad news is that they probably didn't loosen the strings when they put it up there. When you add up the tension produced by all those tight strings, there's a huge force that's trying to collapse the top and pull the pin blocks toward each other. The lower glue joint of hitch pin block seems to be the one that most frequently lets go. In extreme cases, the hitch pin block has been loose for so long and the strings have been so tight that the block begins to rotate, and the end of the soundboard starts to warp up.
(This is a rather extreme case.)
The third bad news is when someone in the past has already tried to repair the lower glue joint of the hitch pin block. I've seen lots of creative attempts - usually nails or screws. (One had tongue & groove floorboards mounted on its back!) These never work. The screws or nails concentrate all that string force, and the way they want to move happens to be in line with the grain of the wood of the back, so they pull right through. You'll always find that the joint has come loose again.
You'll need to look closely at all the glue joints above & below the pin blocks. If you can see any white wood, or if you can even slip the corner of a piece of paper in, the joint is coming loose. Another telltale sign will be if you tune it, and it always has a tendency to go flat as time passes, it probably means the joint is coming loose and the pin block is starting to rotate.
Repair. The only way to soundly repair these joints is to reglue them. The string force needs to be distributed over the entire area of the joint.
There's a long-standing debate among restorers of instruments about what type of glue to use. Hide glue is, in fact, prized by some for its ability to release under heat and moisture. It means you can get an instrument apart again the next time it needs repair. You might need to do this with violins or guitars or reed organs, but I'm not sure it's necessary for zithers. You could scrape or sand or scrub away the old hide glue, use good yellow carpenter's glue, and have something that would hold together forever. That's what I did with my everyday playing instrument.
On the other hand, I've been told that new hide glue (which you can get in a room temperature squeeze bottle) can stick to old hide glue. Often the joint has separated, but not nearly far enough to scrape or sand or scrub. I've used a bellows-type glue applicator with a flattened nozzle to insert hide glue into the bottom hitch pin joint of a Celestaphone. With the doubles strings, this instrument has about as much tension as any, and I've purposely kept it tuned up. After 2 years it shows no signs of re-separation.
By the way, if there's been a lot of rotating and warping, it's pretty tough to get the pin block back where it belongs. Simply clamping down will result in the lower corner edge of the block to dig into the inside of the back. It takes a long gradual increase in clamping, along with some tapping to help de-rotate the block, to get it positioned right.
A final note - although heat does cause the glue to release, don't try to speed up the process of getting all joints to release by putting the instrument in a good hot oven. I tried it on a badly damaged instrument... let's just say it isn't any less damaged now. I've been told you can use an old iron to gently get just enough heat into a joint to release it - never tried it myself.
2. Buckled top.
You should be able to sight along the top and find it pretty straight, without any bulges or dips. If I see any misshaping like that, I'm not willing to tune them up. I've heard people make comments like "Oh, it's stabilized now," but I'm deeply suspicious.In a related issue - when the instrument is tuned, you'll be able to sight along the bottom of the long side if the instrument and see a very slight curve, bowed outward toward the back. No problem.
3. Loose tuning pins.
This is a little hard to evaluate on an instrument lying on a flea market table, unfortunately. Little crescent-shaped gaps behind the tuning pins are not always the symptom of a problem. If you think about the force acting on the tuning pin, you'll see that it's working like a tiny lever. The strongest points of contact between the pin and the hole are the bottom of the pin, away from the string, and the top of the pin, toward the string. And the wood of the soundboard, where you see the pin go in, is softer than the actual wood of the pin block. If you get it home, though, and find that the tuning pins unwind when you try to tune...Repair. There are several approaches. The one I've used is to line the hole to make it small enough to get a good bite on the pin. For example, cut a narrow strip of brown Kraft paper, give it a little bit of a curl, and insert it into the hole. (If the pin's really loose, you might have to make the strip wide enough to go half or 3/4 of the way around the hole.) Make it long enough so that you can get a grip on it for a little while to keep it from rotating with the pin. Press the pin back in as far as it will go, then wind it back in. I've also used square toothpicks in extreme cases. The drawback is that the tuning process won't be as easy. Repairs like this tend to make the pin "jump" instead of moving smoothly while you're tuning. I've had fairly good success with the paper, though.
The next step in this direction is to drill out the pin hole, insert replacement wood, and drill a new correctly-sized hole. I haven't tried this - it seems like it would be easiest to use a dowel as the replacement wood, but the tuning pin threads would no longer be rotating against end grain like they did originally.
The other approach is to use a chemical to make the wood swell and contract the size of the hole. I believe there's a compound used by piano technicians for this purpose.
4. Cracks.
These can appear in the soundboard or the back, the result of wood shrinkage across the grain. I don't know of any way to repair them, because the panel is actually a different size than it used to be. However, though I'd never want to admit it to someone selling one, cracks like this don't appear to result in any degradation of the sound.5. Strings.
It's surprising how pleasant a sound can come out of the original strings. The plain ones can be cleaned up nicely with steel wool or Scotchbrite. Wound ones can be cleaned somewhat, this way, but I fear that it just tends to push particles down into the windings and make them even more dead than they were. And be careful with the lightest wound strings. Sometimes the winding is hair-thin copper, and the steel wool starts shredding it. The the string starts buzzing and is ruined.Missing strings can be a tough problem, though. It's not too bad if the missing strings are plain steel, like most of the ones in the melody section. You can just check the gauge of the little piece of string that's probably still in the tuning pin, and get a string of the same gauge. If you can get it with just a plain loop on the end, that's good. But if there's a little piece of brass in the loop, you can crush it with cutting pliers and pull the pieces out. Be careful not to cut the loop itself. If necessary, you can make another loop by bending the last 3/4" of the string back on itself, over a large nail, and twisting. Make 5 or 6 twists to get a loop that won't undo itself when tightened.
It's those wound strings that are the bugaboo. For a wound string to perform properly, the winding should extend to within about 1/2" of the bridge at each end. No one makes strings with windings that are short enough, or positioned properly after taking into consideration the staggered locations of the hitch pins. Here's what I've done to get by.
Locate a wound string of the right gauge. This can be tricky in itself - I've had to use bass guitar strings for the really heavy chord strings like the F. Place the loop on the hitch pin, and put a clip of some sort on the hitch pin to keep the loop from falling off. Cut completely through the string about 6" beyond the tuning pin. Hold the instrument still (somehow) and grab the cut end of the string with needle-nosed pliers, straight on. Pull straight away from the string. The pliers will be gripping the winding, and it will start to unravel from the core. Keep pulling. It takes a lot of inches of winding to go around a few inches of core. The free end of the core will go whipping around as the winding unravels. Pull off enough winding so that the string is stripped back to about 3/4" past the bridge. Cut the winding at that point. Try to cut as closely to the core as possible, because an end sticking out will give you a buzz.
Don't forget that the goal is to get the winding as close to the bridge as possible. If the factory position of the loop yields a long stretch of unwound wire above the lower bridge, you might want to consider cutting a bit off and twisting a new loop. Insufficient winding results in some pretty unpleasant sounds.
Now there is exactly one set of replacement strings available that's labeled guitar-zither. It's made by E. & O. Mari, with the brand name LaBella. Be careful to measure the distance on your instrument between bridges at the wound strings, before buying this set. The length of the windings is very short, around 14 9/16", and they won’t sound very good on a Phonoharp instrument or the Menzenhauer/Oscar Schmidt instruments. (The only exception would be a very early Menzenhauer # 0 or 0 ½.) My guess, based on the number of strings in the set, is that they fit a modern German instrument, labeled Jubeltone or Musima, that has 5 chords and is chromatic in the melody section. I don’t have one just like this, but the 3-chord German instrument that I have is about the right size for these strings.
6. Appearance.
This doesn't have much to do with playability, but I never refinish an instrument. Stripping and repainting, even if reproduction decals were available, would throw away the "old-ness" of the thing - you couldn't tell if it was old or if someone just made a new one. I have put on a little polyurethane varnish or tung oil to brighten up and preserve whatever has survived of the finish. I've also heard of a process that involves heating and reflowing the original varnish. Some instruments in Eileen Roys's wonderful collection of antique autoharps have undergone this process, and they look fine.7. Cleaning.
The best way to really get all that gunk off is to remove all the strings & the tuning pins and scrub 'er down with Murphy's oil soap or just water. But it's a real task to get all those old strings back on again. I usually compromise by wrapping a wet paper towel around a ruler or paint stirrer and go under the strings, and just give up on all those tiny areas around the tuning pins. High-pressure air or a paintbrush will remove the loose stuff.Drop me a line.
Go back to the Guitar-Zither Clearinghouse, or home.
This page banged out with Word 97, 7 Feb 99.